


运动控制卡应用开发教程之使用Qt
今天,我们来讲解一下正运动技术运动控制卡应用开发教程之Qt。
此前,我们与大家分享过“开放式Linux平台控制器XPLC516E及其Linux下的Qt开发”,我们知道正运动部分控制器支持Linux系统,支持嵌入式Qt开发。
正运动技术支持功能强大的Qt动态链接库以及拥有简单易读的运动控制库函数手册说明,代码移植性强,非常方便运动控制开发上手,能极大缩短开发人员开发智能装备的时间周期。
在正式学习之前,我们先了解一下正运动技术的运动控制卡ECI2418和ECI2618。这两款产品分别是4轴,6轴运动控制卡。

ECI2418支持4轴脉冲输入与编码器反馈,板载24点输入,16点输出,2AD,2DA,支持手轮接口,其中特定输出支持高速PWM控制。

ECI2618支持6轴脉冲输入与编码器反馈,板载24点输入,16点输出,2AD,2DA,支持手轮接口,其中特定输出支持高速PWM控制。

ECI2418,ECI2618均使用同一套API函数,均支持C、C++、C#、LabView、Python、Delphi等开发语言,支持VC6.0、VB6.0、Qt、.Net等平台,支持Windows、Linux、WinCE、iMac等操作系统。
一、运动控制卡应用之Qt开发流程
1、使用Qt软件新建Qt项目

2、将动态库以及相关文件“libzmotion.so、zaux.cpp、zaux.h、zmotion.h”复制到新建的Qt项目里面。

在光盘资料里面,下载上图圈出的四个文件,并通过终端复制到新建的Qt工程里面。
3、在Qt项目里面添加动态库“libzmotion.so”
A、首先右键项目,点击添加库。

B、选择外部库,点击Next。

C、点击浏览库文件,选择刚刚复制进去的动态库,点击Next。

D、最后点击finish即可完成动态库添加。

注意事项:Linux环境下动态库的名字必须是lib开头才能识别。
4、在Qt项目里面添加头文件“zmotion.h、zaux.h”
A、首先右键Headers,点击Add Existing Files...

B、找到刚刚复制放进项目的zmotion.h文件,双击zmotion.h即可添加头文件zmotion.h到项目中。

C、重复上面两个步骤,将zaux.h文件也添加到项目中。
5、在Qt项目里面添加cpp源文件"zaux.cpp”
A、首先右键Sources,点击Add Existing Files...

B、找到刚刚复制放进项目的zaux.cpp文件,双击zaux.cpp文件即可添加源文件zaux.cpp到项目中。

6、在mainwindow.h中添加 #include “zmotion.h”、 #include “zaux.h”和定义控制器的连接句柄g_handle。

7、使用link按钮的槽函数用以太网连接控制器
A、在Qt的ui设计界面中添加一个按钮重命名为Link,右击Link按钮点击Go to slot...跳转到该按钮的槽函数。

B、查阅ZMotion PC 编程手册,了解用以太网连接控制器接口函数的用法 。

C、参考光盘资料里面的PC编程手册中ZAux_OpenEth函数的用法在槽函数中编写代码,进行功能实现。

8、控制器实现插补运动,代码实现过程。
A、在Qt的ui设计界面中添加一个按钮重命名为move,右击move按钮点击Go to slot...跳转到该按钮的槽函数。

B、查阅ZMotion PC 编程手册,了解用以插补运动接口函数的用法 。

C、根据PC编程手册中ZAux_Direct_Move函数的用法在槽函数中编写代码,进行功能实现。

9、运动程序设计完毕,点击运行按钮。

注意:上位机用以太网连接控制器时,需要控制器和PC在同一网段下才能连接成功。
二、运动控制卡应用之Qt例程讲解
1、在正运动技术的光盘资料里有很多Qt的例程,通过这些例程可以更容易的上手正运动技术的控制器。以下是一个详细例程的讲解。

2、例程的单轴运动的功能说明
a、通过以太网链接到指定IP的控制器;
b、设置运动轴参数;
c、选择运动轴对象;
d、选择运动方式,实现持续运动和寸动;
3、例程的单轴运动的具体实现

(1)实现以网口方式链接控制器

A、在下拉框中手动添加IP:进入uI设计界面双击下拉框加入控制器Ip,方法如下。

B、参考ZMotion PC函数编程手册,熟悉ZAux_OpenEth()接口用法。

C、通过Open按钮的槽函数( on_pushButton_OpenEth_clicked()),调用动态库(zmotion.so)提供的链接控制器接口(ZAux_OpenEth()),实现与控制器的链接。
//以太网连接控制器
void MainWindow::on_pushButton_OpenEth_clicked()
{
int32 iresult;
char * tmp_buff = new char[16];
QString str, str_title;
/*从下拉框中获取IP*/
str = ui->comboBox_IP->currentText();
QByteArray ba = str.toLatin1();
tmp_buff = ba.data();
/*链接控制器*/
iresult = ZAux_OpenEth(tmp_buff,&g_handle);
if(0 == iresult)
{
str_title = ("linked:");
str_title += tmp_buff;
setWindowTitle(str_title);
/*开启定时器*/
m_nTimerId = startTimer(10);
}
else
{
setWindowTitle("no link!");
}
}
D、参考ZMotion PC函数编程手册,熟悉ZAux_OpenEth()接口用法。

E、通过Close按钮的槽函数( on_pushButton_CloseEth_clicked()),调用动态库(zmotion.so)提供的断开链接控制器的接口(ZAux_Close()),实现断开与控制器的链接。
//断开网口连接
void MainWindow::on_pushButton_CloseEth_clicked()
{
if(0 != g_handle)
{
/*断开链接*/
ZAux_Close(g_handle);
g_handle = NULL;
setWindowTitle("no line");
/*关闭定时器*/
killTimer(m_nTimerId);
m_nTimerId=-1;
}
}
(2)获取轴运动的信息以及输入输出口的信息

A、将X、Y、Z、R单选框设置到同一个按钮组中用于轴选择。

B、通过定时器超时处理函数,调用动态库“zmotion.so”提供的获取轴dpos、vpspeed、idle信息的接口和输入输出口状态信息获取接口,实现对控制器状态的监控。
//定时器超时处理函数
void MainWindow::timerEvent(QTimerEvent *event)
{
if(m_nTimerId == event->timerId())
{
int idle;
float fdpos, fvspeed;
QString str_tmp;
/*获取轴状态*/
ZAux_Direct_GetIfIdle(g_handle,AxisGroup->checkedId(),&idle);
str_tmp = QString("Idle : %1").arg(idle?"stop":"run");
ui->label_statue->setText(str_tmp);
/*获取dpos*/
ZAux_Direct_GetDpos(g_handle,AxisGroup->checkedId(),&fdpos);
str_tmp = QString("Dpos : %1").arg(fdpos);
ui->label_dpos->setText(str_tmp);
/*获取vspeed*/
ZAux_Direct_GetVpSpeed(g_handle,AxisGroup->checkedId(),&fvspeed);
str_tmp = QString("Vspeed : %1").arg(fvspeed);
ui->label_vspeed->setText(str_tmp);
uint8 in, out, i=0,j=0,k=0;
char buff[128]={0};
/*获取输入口状态*/
ZAux_GetModbusIn(g_handle, 0, 7, &in); //获取in0-in7状态
/*获取输出口状态*/
ZAux_GetModbusOut(g_handle, 0, 7, &out);//获取out0-out7状态
/*十进制转二进制*/
for(i=0; i<8; i++)
{
buff[i]=in%2;
in = in/2;
if(1 >= in)
{
buff[i+1]=in;
break;
}
}
/*更新UI信息*/
buff[0]? ui->checkBox_IN0->setChecked(true):ui->checkBox_IN0->setChecked(false);
buff[1]? ui->checkBox_IN1->setChecked(true):ui->checkBox_IN1->setChecked(false);
buff[2]? ui->checkBox_IN2->setChecked(true):ui->checkBox_IN2->setChecked(false);
buff[3]? ui->checkBox_IN3->setChecked(true):ui->checkBox_IN3->setChecked(false);
buff[4]? ui->checkBox_IN4->setChecked(true):ui->checkBox_IN4->setChecked(false);
buff[5]? ui->checkBox_IN5->setChecked(true):ui->checkBox_IN5->setChecked(false);
buff[6]? ui->checkBox_IN6->setChecked(true):ui->checkBox_IN6->setChecked(false);
buff[7]? ui->checkBox_IN7->setChecked(true):ui->checkBox_IN7->setChecked(false);
memset(buff,0,8);
/*十进制转二进制*/
for(i=0; i<8; i++)
{
buff[i]=out%2;
out = out/2;
if(1 >= out)
{
buff[i+1]=out;
break;
}
}
/*更新UI信息*/
buff[0]? ui->checkBox_OUT0->setChecked(true):ui->checkBox_OUT0->setChecked(false);
buff[1]? ui->checkBox_OUT1->setChecked(true):ui->checkBox_OUT1->setChecked(false);
buff[2]? ui->checkBox_OUT2->setChecked(true):ui->checkBox_OUT2->setChecked(false);
buff[3]? ui->checkBox_OUT3->setChecked(true):ui->checkBox_OUT3->setChecked(false);
buff[4]? ui->checkBox_OUT4->setChecked(true):ui->checkBox_OUT4->setChecked(false);
buff[5]? ui->checkBox_OUT5->setChecked(true):ui->checkBox_OUT5->setChecked(false);
buff[6]? ui->checkBox_OUT6->setChecked(true):ui->checkBox_OUT6->setChecked(false);
buff[7]? ui->checkBox_OUT7->setChecked(true):ui->checkBox_OUT7->setChecked(false);
}
}
(3)轴参数设置

通过参数生效按钮的槽函数“on_ParaSet_clicked()”,调用动态库(zmotion.so)提供的获取轴参数设置接口,对轴参数进行设置。
//参数设置
void MainWindow::on_ParaSet_clicked()
{
QString str_tmp;
float float_tmp;
int isidle = 0;
/*获取轴号*/
axis_num = AxisGroup->checkedId();
/*轴正在运行无法运动*/
ZAux_Direct_GetIfIdle(g_handle,axis_num,&isidle);
if(!isidle)
{
return;
}
/*设置units */
str_tmp = ui->lineEdit_Units->text();
float_tmp = str_tmp.toFloat();
ZAux_Direct_SetUnits(g_handle, axis_num, float_tmp);
/*设置 speed */
str_tmp = ui->lineEdit_Speed->text();
float_tmp = str_tmp.toFloat();
ZAux_Direct_SetSpeed(g_handle,axis_num,float_tmp);
/*设置 accel */
str_tmp = ui->lineEdit_Accel->text();
float_tmp = str_tmp.toFloat();
ZAux_Direct_SetAccel(g_handle,axis_num,float_tmp);
/*设置 decel */
str_tmp = ui->lineEdit_Decel->text();
float_tmp = str_tmp.toFloat();
ZAux_Direct_SetDecel(g_handle,axis_num,float_tmp);
/*设置sramp */
str_tmp = ui->lineEdit_Sramp->text();
float_tmp = str_tmp.toFloat();
ZAux_Direct_SetSramp(g_handle,axis_num,float_tmp);
}
(4)单轴寸动/持续运动

A、通过Run按钮的槽函数“on_pushButton_Run_clicked()”,调用动态库“zmotion.so”提供的相关接口函数,对轴进行运动控制。
//Run按钮的槽函数
void MainWindow::on_pushButton_Run_clicked()
{
QString str_tmp;
float float_tmp;
int isidle = 0;
ZAux_Direct_GetIfIdle(g_handle,axis_num,&isidle);
if(!isidle)
{
qDebug()<<"not stop";
return;
}
/*示波器触发*/
ZAux_Trigger(g_handle);
/*单轴运动*/
if(1 == RunModeGroup->checkedId())//inch
{
str_tmp = ui->lineEdit_inchdis->text();
float_tmp = str_tmp.toFloat();
ZAux_Direct_Singl_Move(g_handle,axis_num,ui->checkBox_dir->checkState()?-float_tmp:float_tmp);
}
else if(0 == RunModeGroup->checkedId())//continue
{
ZAux_Direct_Singl_Vmove(g_handle,axis_num,ui->checkBox_dir->checkState()?-1:1);
}
}
B、通过Stop按钮的槽函数“on_pushButton_Stop_clicked()”调用相关接口实现停止轴运动的功能。
//Stop按钮的槽函数
void MainWindow::on_pushButton_Stop_clicked()
{
int isidle = 0;
ZAux_Direct_GetIfIdle(g_handle,AxisGroup->checkedId(),&isidle);
if(isidle) return;
/*单轴停止*/
ZAux_Direct_Singl_Cancel(g_handle,AxisGroup->checkedId(),2);
}
(5)编译运行调试

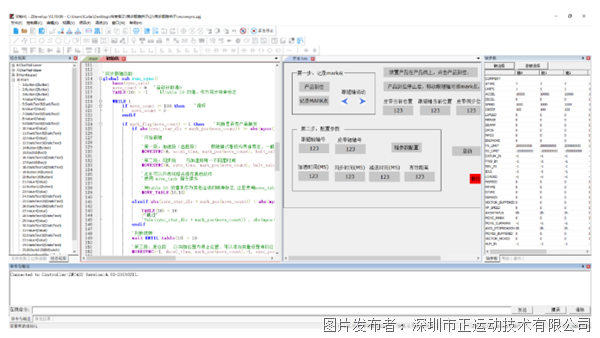
在自己开发程序连接的同时,还可以通过ZDevelop来调试与诊断控制器的状态。
配合ZDevelop软件进行调试,通过ZDevelop中的轴参数,输入口,输出口,示波器,等等小工具可以更直观的对控制器的状态进行监控。

在示波器窗口中可以看到单轴移动300用户单位的曲线图。

今天,正运动技术的运动控制卡应用开发教程之Qt就分享到这里。更多精彩内容,请关注我们的公众号。


 投诉建议
投诉建议
提交
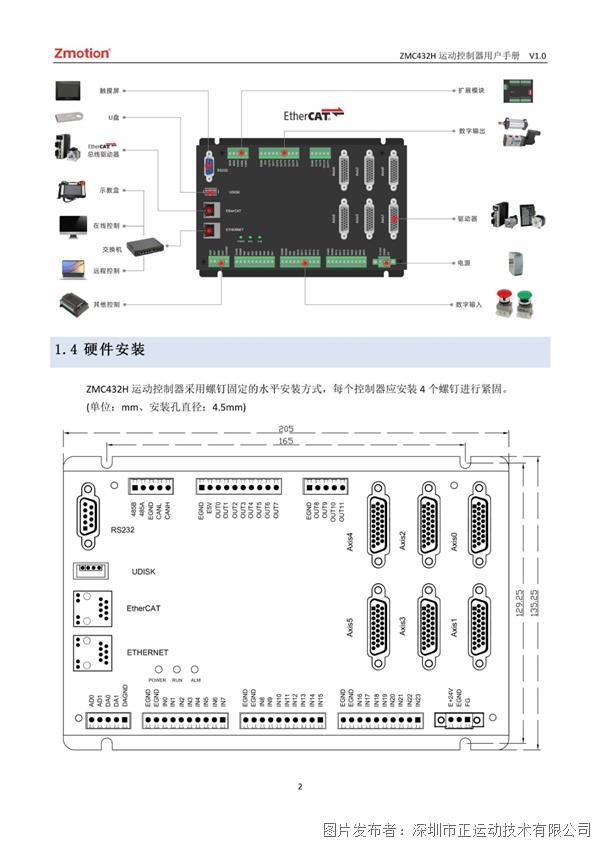
正运动全国产EtherCAT运动控制器ZMC432H用户手册
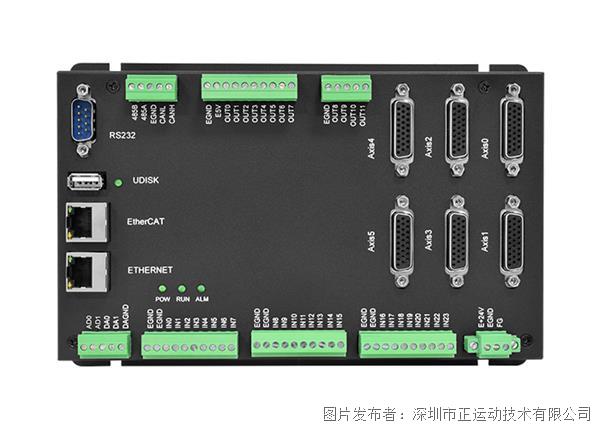
正运动全国产EtherCAT运动控制器ZMC432H
正运动技术运动控制器如何快速实现单轴/多轴同步跟随功能?
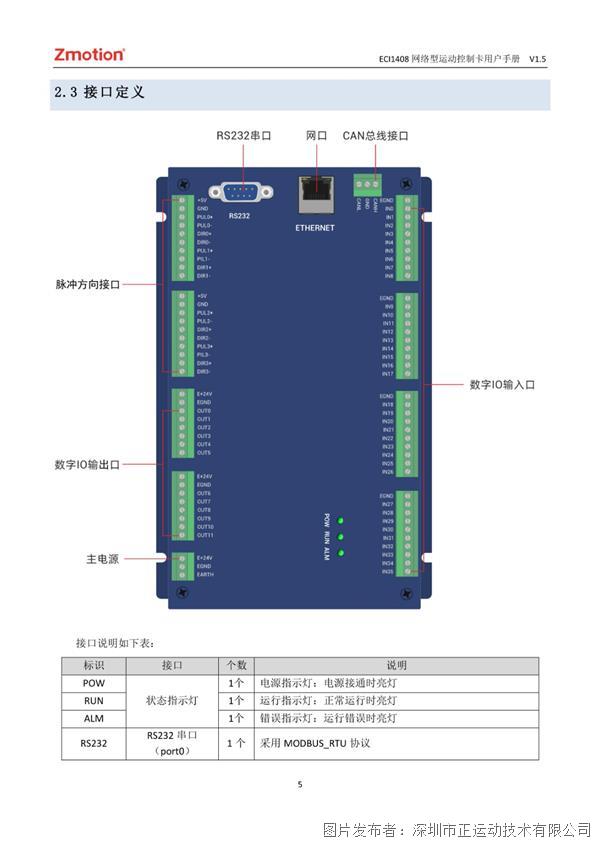
正运动ECI1408运动控制卡用户手册
正运动机器视觉运动控制一体机VPLC710