


通过网络远程控制ARM系统GPIO应用实例
1). 简介
本文着重展示基于Embedded Linux快速开发Web应用程序访问ARM系统以便于远程操控硬件GPIO或监控其状态.文中演示实例所采用的ARM系统硬件为Toradex 基于NXP Vybrid的产品级ARM核心板ColibriVF61配合其Colibri开发板;软件框架为使用Node代码通过filesystem来访问操控硬件GPIO,创建一个简单UI并使用Express开发框架搭建一个最简web服务器并通过AJAX呼叫和客户端进行通信,最后在客户端使用Javascript配合HTML+CSS/jQuery/AJAX开发一个客户端应用程序.
Node.js是一个用于基于Javascript开发应用的服务器端的runtime环境,自带有管理文件系统模块,而Linux操作系统支持使用文件系统访问硬件设备的特性,因此可以基于Node开发应用来访问操控系统硬件GPIO设备.不过尽管Node也提供了如HTTP等模块可以用来搭建Web服务器,本文还是采用更为简单的利用Express开发框架来搭建.
客户端应用使用Javascript编程语言开发,通过浏览器执行.配合HTML和CSS,Javascript可以实现用户交互的网页开发,也就是响应式设计. 不过直接使用Javascrit进行开发需要一定周期,本文采用一个跨浏览器JavaScript库jQuery来快速实现如DOM操作,事件处理以及AJAX方法(和服务器异步通讯达到动态改变页面内容的一系列技术)使用等
2). 硬件准备
a). ColibriVF61核心板模块以及Colibri开发板载板
b). GPIO以及对应Button和LED设置如下所示, VF61最多支持99个GPIO管脚, 本文使用4个GPIO分别连接Colibri载板上面的两个Button和两个LED.
SW5, X21 Pin9 <->GPIO-63(SODIMM_106), X11 Pin39
SW6, X21 Pin11 <->GPIO-89(SODIMM_135), X11 Pin40
LED1, X21 Pin2 <->GPIO-88(SODIMM_133), X11 Pin41
LED2, X21 Pin4 <->GPIO-68(SODIMM_127), X11 Pin42
详细的关于管脚定义和GPIO号码请参考VF61手册,Colibri开发板手册以及GPIO号码映射.
3). 软件配置
a). Embedded Linux系统为Toradex官方发布imageV2.5, 也可以参考这里基于OpenEmbedded框架自己编译系统image.
b). 在VF61 Embedded Linux中安装node.js并验证运行正常
-------------------
root@colibri-vf:~# opkg update
root@colibri-vf:~# opkg install nodejs
root@colibri-vf:~# node
> process.exit ()
root@colibri-vf:~#
-------------------
c). 在VF61 Embedded Linux中安装nodemon,Express和body-parse
-------------------
root@colibri-vf:~# opkg install tar
root@colibri-vf:~# curl -Lhttps://www.npmjs.com/install.sh | sh
root@colibri-vf:~# npm install express
root@colibri-vf:~# npm install body-parser
root@colibri-vf:~# npm install -g nodemon
-------------------
4). GPIO操作
详细Embedded Linux GPIO操作请见这里,下面只用一个GPIO-63举例
a). 初始化GPIO-63并设置为Input
-------------------
root@colibri-vf:/sys/class/gpio# echo 63> /sys/class/gpio/export
root@colibri-vf:/sys/class/gpio# echo"in" > /sys/class/gpio/gpio63/direction
-------------------
b). 查看当前GPIO-63电平
-------------------
root@colibri-vf:/sys/class/gpio/gpio63# cat/sys/class/gpio/gpio63/value
0
-------------------
c). 按下GPIO连接的Button同时查看电平
-------------------
root@colibri-vf:/sys/class/gpio/gpio63# cat/sys/class/gpio/gpio63/value
1
-------------------
5). Nodedemo1 -使用Node.js操控GPIO
完整代码请见这里,需创建’server.js’文件, 核心部分列出如下:
a). Filesystem模块
-------------------
/* Modules */
var fs = require('fs'); //module to handlethe file system
var debug = require('debug')('myserver');//debug module
/* VF61 GPIO pins */
const SW5= '63', // PTD31, 106(SODIMM)
SW6= '89', // PTD10, 135(SODIMM)
LED1 = '88', // PTD9, 133(SODIMM)
LED2= '68', // PTD26, 127(SODIMM)
/* Constants */
const HIGH = 1, LOW = 0;
-------------------
b). GPIO配置和操作模块
-------------------
function cfGPIO(pin, direction){......} //export pin if not exported and configurethe pin direction
function rdGPIO(pin){......} //read GPIO value and return it
function wrGPIO(pin, value){......} //write value to corresponding GPIO
-------------------
c). LED根据Button状态显示模块
-------------------
function copySwToLed(){......} //Copy theSW values into the LEDs
-------------------
主函数模块,使用setinterval循环函数,第二个参数为循环间隔
-------------------
setImmediate(function cfgOurPins(){
cfGPIO(LED1,'out'); //call cfGPIO to configure pins
cfGPIO(LED2,'out');
cfGPIO(SW5,'in');
cfGPIO(SW6,'in');
setInterval(copySwToLed,50); //poll the GPIO and copy switches status to LEDs
});
-------------------
d). 在VF61上面执行’server.js’,并通过按键来验证LED显示
-------------------
node server.js
-------------------
6). Nodedemo2 - 创建webserver和最简web UI来远程操控GPIO
完整代码请见这里
a). 修改’server.js’, 创建Webserver
-------------------
/* Modules */
var express = require('express');//webserver module
var bodyParser = require('body-parser');//parse JSON encoded strings
var app = express();
/* Constants */
const HIGH = 1, LOW = 0, IP_ADDR ='10.20.1.108', PORT_ADDR = 3000;
//Using Express to create a server
app.use(express.static(__dirname));
var server = app.listen(PORT_ADDR, IP_ADDR,function () {
var host = server.address().address;
var port = server.address().port;
var family = server.address().family;
debug('Express server listening at http://%s:%s %s', host, port,family);
});
-------------------
b). 修改’server.js’, 增加HTTP POST接收并处理返回数据部分
-------------------
app.use(bodyParser.urlencoded({ //tosupport URL-encoded bodies, must come before routing
extended:true
}));
app.route('/gpio') //used to unite all therequst types for the same route
.post(function (req, res) { //handlesincoming POST requests
var serverResponse = {status:''};
var btn = req.body.id, val = req.body.val; // get the button id andvalue
if(val == 'on'){ //if button is clicked, turn on the leds
wrGPIO(LED1, HIGH);
wrGPIO(LED2, HIGH);
debug('Client request to turnLEDs on');
serverResponse.status = 'LEDsturned on.';
res.send(serverResponse); //sendresponse to the server
}
else{ //if button is unclicked, turn off the leds
wrGPIO(LED1, LOW);
wrGPIO(LED2, LOW);
debug('Client request to turn LEDs off');
serverResponse.status = 'LEDs turned off.';
res.send(serverResponse); //send response to the server
}
});
setImmediate(function cfgOurPins(){
......
setInterval(copySwToLed,50); //poll the GPIO and copy switches status to LEDs
});
-------------------
c). 在当前文件夹创建’index.html’
./ 请从这里下载jQuery库并放在同一文件夹
./ ‘index.html’代码如下
-------------------
Accessto the VF61 GPIO using Node.js and AJAX
-------------------
d). 在当前文件夹创建’client.js’, 用来处理客户端操作
-------------------
$(function(){
$(".btn").click(functionclickHandling(){ //if element of class "btn" is clicked
varbtn_status = {id:"", val:""}; //data to be sent to theserver
if(this.checked){//check whether button is pressed or not
$(this).siblings().html("ON").css("color","green");//changes label and color
btn_status.id= $(this).attr("id"); //get which button was clicked
btn_status.val= "on"; //tell the server the button is clicked
}
else{//if button was unclicked
$(this).siblings().html("OFF").css("color","red");//changes label and color
btn_status.id= $(this).attr("id"); //get which button was clicked
btn_status.val= "off"; //tell the server the button is unclicked
}
$.post("/gpio",btn_status, function (data, status){ //send data to the server via HTTP POST
if(status== "success"){ //if server responds ok
console.log(data);//printserver response to the console
}
},"json");//server response shuld be in JSON encoded format
});
});
-------------------
e). 在VF61运行’server.js’,启动服务
-------------------
root@colibri-vf:~# DEBUG=myserver nodeserver.js
-------------------
f). 在客户端浏览器查看
登录http://10.20.1.108:3000,在打开的页面操作checkbox来控制LED灯

7). Nodedemo3 - 升级友好界面客户端UI来远程操控GPIO
完整代码请见这里
a). 修改’index.html’, 使用Bootstrap框架修改显示效果适配移动设备
-------------------
Accessto the VF61 GPIO using Node.js and AJAX
LEDs
Switches
-------------------
b). 相应修改‘server.js'和’client.js’, 详见完整代码
client.js 中SW按键操作SW1切换当前LED焦点, SW2改变当前LED状态
c). 在VF61上面同上运行server.js启动,在客户端浏览器登录http://10.20.1.108:3000查看


 投诉建议
投诉建议
提交

Verdin AM62 LVGL 移植
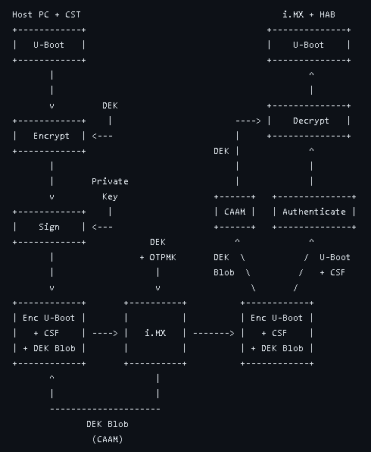
基于 NXP iMX8MM 测试 Secure Boot 功能

隆重推出 Aquila - 新一代 Toradex 计算机模块

Verdin iMX8MP 调试串口更改
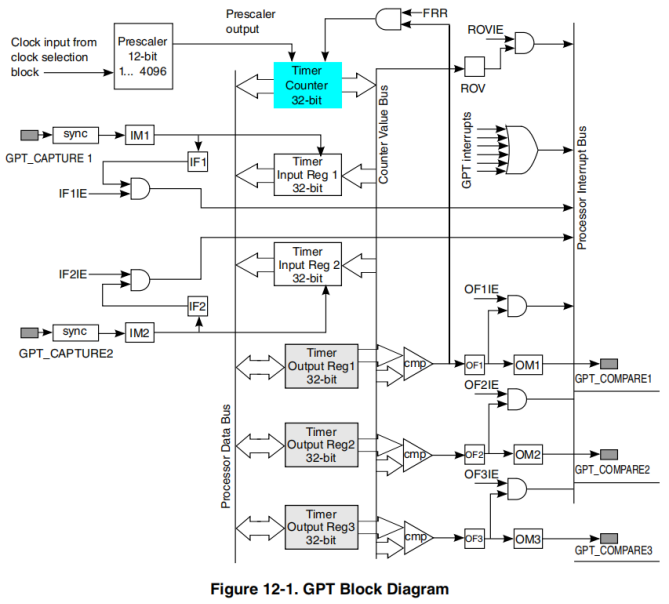
NXP iMX8MM Cortex-M4 核心 GPT Capture 测试